Infinity Gauntlet Paracord Bracelet

The Marvel Cinematic Universe, perhaps the longest theatrical movie series ever made (if it can be called a series), comes to a climax this weekend with Avengers: Infinity War.
The central villain of the movie, Thanos, wields a weapon—or collection of weapons—known as the infinity gauntlet, with which he intends to wreak general havoc on the universe. (Yes, comic fans, I realize it is much more complicated than that, but spoilers!)
How to Rule The Universe Without Collecting All The Infinity Stones

I wasn't quite as motivated as Thanos, so I made my own "infinity bracelet" out of paracord, a highly durable nylon rope that just might survive the end of the universe.
I wanted to keep the look and feel of the gauntlet while adapting it to a bracelet form. A wide weave was a must, and I really liked the look of the trilobite weave.
For colors, I chose Coyote and Goldenrod. I didn’t think those colors would go well together, but they actually create a nice bronze look. I started with 10' of each and had about 3' left over. For the gems, I honestly just used some remnants that I had lying around. You will only need about a foot of each of those colors, gutted.
If you want bright colors for the stones, take a look at our neons. If you want to pick out your own, more subdued colors, visit our improved color explorer. Our colors are all available in as little as 10' lengths.
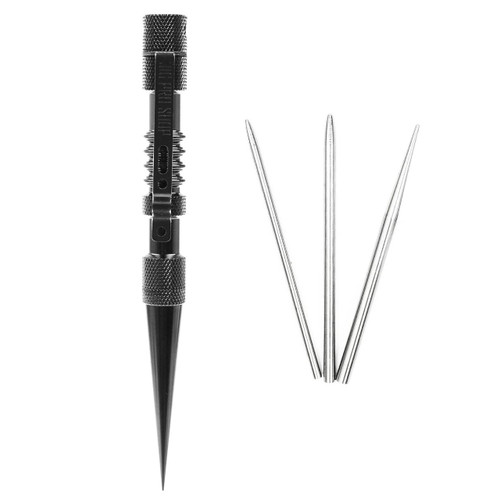
Quick product plug here: For this project, I relied heavily on the knotter's tool. It is a set of three fid needles, stored inside a larger spike. The fids screw onto the end of your paracord, allowing you to thread it through a knot or weave quite easily.
Adding the "infinity stones" onto this bracelet required that I weave gutted paracord through the finished bracelet. The type II needle was just right for fitting onto the gutted 550 cord. The large spike proved just as useful when I had to undo stitches after doing them wrong. (you will hear me saying that often throughout my tutorials!)
If you're not ready to drop that much money on a hobby tool, you can wait for another tool sale, or buy fids individually.
You can also make do with certain other tools or make a homemade fid out of wire.
Now that that's out of the way, onward!
The Gauntlet (Trilobite Weave Bracelet)

In this two color trilobite, you will need to melt the ends of the two colors together. (The numbers in parenthesis go along with the numbers in the black and red diagram.)
Make a cow hitch (1) on the female buckle end. Your color splice point should be about an inch past your hitch.
The other end is a bit trickier. You will need to make two cow hitches on the male end of the buckle, one with each color (2,3). Your working ends should be toward the outside.
Then, take both working ends and thread them back through the female end of the buckle, through the top and out the bottom (4,5). Your project should look something like the top picture in the diagram at the right.
Setup is done, now it's time to weave! Take the bottom strand (white) and thread it through, going over the first center line, under the next two, and over the last. (6)
Then, do the inverse with the top strand (red). It should go under the first, over the next two, and under the last. (7)
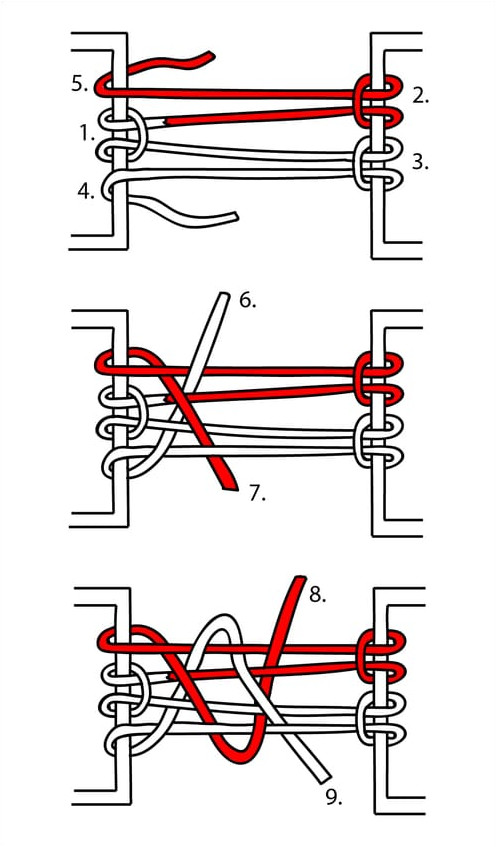
Steps 8 and 9 are just a repeat of 6 and 7, except note that the colors have changed places. The strand on bottom (left if you are weaving toward yourself) always goes over the first center strand. The top side will always go under the fist strand. Before going farther, be sure to tighten your previous passes, pulling each color tight and squishing your rows together.
Continue steps 6-8 until you reach the other end of the bracelet. It should look something like this picture.
Fids will make the last couple of stitches easier, but they are by no means necessary for this step.
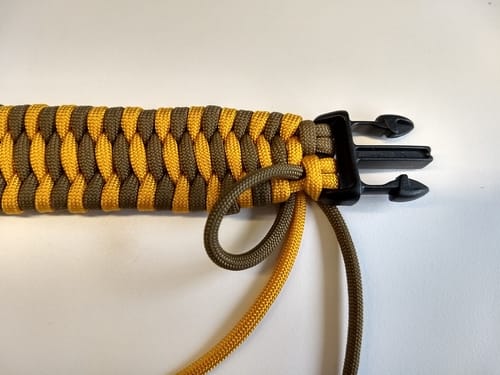
Once you feel you cannot squeeze any more rows into your bracelet, do a half pass with one of your colors so that they are both sticking out the bottom.
Clip them one half inch from the bracelet, melt them with your lighter, and flatten them against the bracelet using the edge of your scissors. (The way I finished the bracelet in the picture here is a little bit different from the linked tutorial up in the introduction. Either way works.)
The Infinity Stones

Now, assuming you have found all the stones, it's time to embed them into your gauntlet—er, bracelet. The gauntlet contains 6 stones, each a different color. You will need a type II or type III fid for this part!
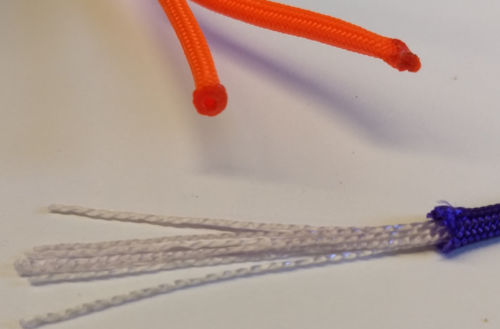
Cut about a foot of each of your gem colors and gut them. That is to say, pull out all of the white center strands.
Now, in order to fit the gutted paracord in a fid needle, you will need to melt one end, and while it is still a little warm, roll the end between your fingers.
The other end of your gutted cords will need to be melted and flattened with a scissors so that they do not pull through when you start weaving. (This is similar to tying a knot in the end of your thread before sewing on a button, but who actually knows how to do that?!)
The orange cord in the picture shows how these ends should look
Start from the middle of the bracelet. I chose to add a brass ring around the center gem to set it apart, sort of like the one on the back of the palm of the gauntlet in the movie.
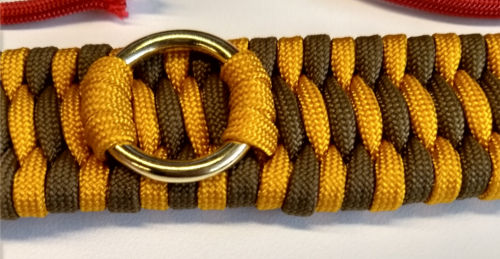
To keep my gems from showing on the bottom side of the bracelet, I wove it underneath the bracelet strands on the bottom. (Ultimately, it doesn’t matter as no one will see that side, and anyhow, people will be otherwise occupied as they run for their lives at the show of your power.)
The order of the colors and even the colors themselves are somewhat arbitrary, as they have been rearranged countless times throughout their comic book history. I did my best to match the order in the new movie.
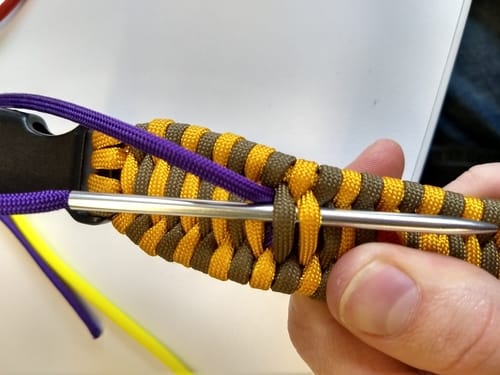
Each gem is two bracelet rows wide. I started with three stripes of flattened cord and then decided to make it more rounded by adding two diagonals on top of that in an "X" pattern.
As you can see in the finished pictures, I centered 5 of the 6 gems on the middle of the bracelet, and put the last one to the far right, where the thumb would be if it were actually a gauntlet.
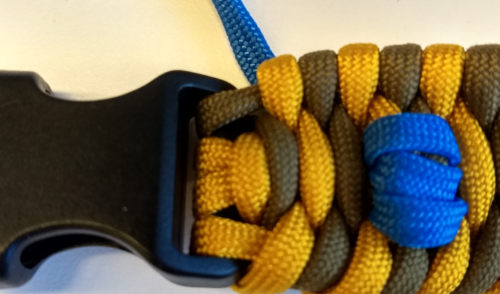
As an optional last step, you can use your discarded center strands and thread them over each stone, adding the impression of a spectral highlight. (Or better yet, use the reflective cord that is 20% off for the next few days!) I'm not sure if I like how the highlights turned out on mine or not. I'll bet that one of my readers can come up with a better execution of that idea.

Now you are ready to destroy half the universe!
Just be kind and leave my half intact, please.Luke
Supplies used for the Infinity Bracelet:
- Paracord colors: Coyote and Goldenrod(10' of each), and various bright colors for gemstones (1' each of 6 different colors)
- 3/4" black buckle
- 1" brass ring (New!)
- Knotter's tool or set of fids


